
LTI Advantage uses OpenID Connect and OAuth 2.0 for authentication and authorization. In particular:
- When a platform launches a tool, it initiates an OpenID Connect third party login. The tool then sends an Authentication Request to the platform, and the platform responds with an id_token (a signed JWT) with LTI parameters (e.g. context) as claims (e.g. https://purl.imsglobal.org/spec/lti/claim/context). And finally, the tool validates the id_token and renders itself appropriately.
- For its part in this flow, the tool must make a request to the Authorization Endpoint on the platform, and retrieve the platform’s public key using the JSON Web Key Set Endpoint (JWKS) to validate the id_token. Identity Model provides a client library to help make the Authentication Request.
- When the tool is ready to use one of the service APIs (e.g. to get the membership of a context) it sends an Access Token Request to the platform. The platform responds with an Access Token containing the Client Credentials. The tool then includes the token as an Authorization header in the API request.
- For its part in this flow, the tool must must make a request to the Token Endpoint on the platform. The Identity Model client library also helps with that request.
In my sample tool, I use the Identity Model client library to help make requests to the Authorization, JWKS, and Token endpoints. Full source code is available in GitHub:
- LtiAdvantageTool – Sample LTI Advantage Tool
- LtiAdvantage – LTI Advantage library
- LTIAdvantage.IdentityModel – LTI Advantage extensions for Identity Model
Add Identity Model to the ASP.NET Core Web App
I started my sample tool using the ASP.NET Core Web Application Razor Pages template with Individual User Accounts.
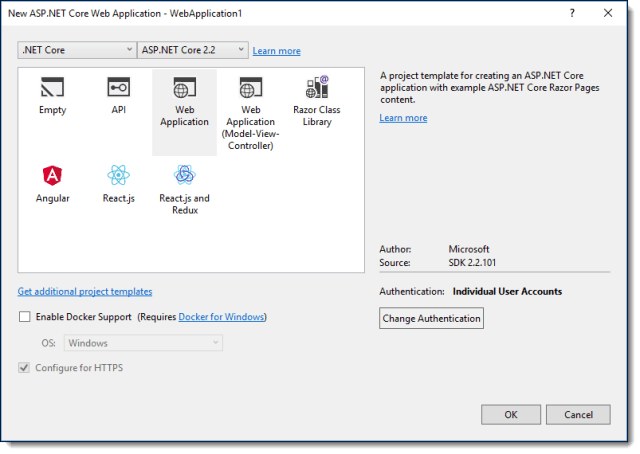
Selecting Individual User Accounts adds ASP.NET Core Identity and Entity Framework Core to the project. I added Identity Model from NuGet:
PM > Install-Package IdentityModel
Launching
The platform will launch a tool from a resource link or for deep linking. In either case, the platform will first initiate an OpenID Connect third party login. That means the tool will receive a GET or POST request from the platform with values in the querystring if it is a GET request or in the body if it is a POST request:
- iss – The issuer (i.e. the platform)
- login_hint – The user id of the user that initiating the launch
- target_link_url – The endpoint to be executed at the end of the OpenID Connect Authentication flow (i.e. the tool URL).
- lti_message_hint – An opaque value that identifies the source of the launch. The platform will use this when it authenticates the launch.
When the tool receives the request, it sends an Authentication request back to the platform asking for an id_token to be POSTed to the target_link_url. I used IdentityModel’s CreateAuthorizeUrl to help build the request:
            var ru = new RequestUrl(platform.AuthorizeUrl);
            var url = ru.CreateAuthorizeUrl
            (
                clientId: platform.ClientId,
                responseType: OidcConstants.ResponseTypes.IdToken,

                // POST the id_token directly to the tool's launch URL
                redirectUri: TargetLinkUri,
                responseMode: OidcConstants.ResponseModes.FormPost,

                // Per IMS guidance
                scope: OidcConstants.StandardScopes.OpenId,

                // Consider checking state after redirect to make sure the state was not tampared with
                state: CryptoRandom.CreateUniqueId(),

                // The userId
                loginHint: LoginHint,

                // Consider checking nonce at launch to make sure the id_token came from this flow and not direct
                nonce: CryptoRandom.CreateUniqueId(),

                // No user interaction
                prompt: "none",

                // The messagedId (i.e. resource link id or deep link id)
                extra: new { lti_message_hint = LtiMessageHint }
            );

            _logger.LogInformation("Requesting authentication.");

            return Redirect(url);
If the platform determines the request is legit, it will POST an id_token to the target_link_url with all the claims necessary to launch the tool. The tool must validate the id_token and then render itself appropriately.
Calling a Service API
When the tool is ready to use one of the LTI Advantage services, it requests an Access Token from the platform. Identity Model includes the RequestClientCredentialsTokenAsync method for this, but this method assumes the platform will validate the request by directly comparing the client secret. IMS’ reference implementation will validate the request by verifying the signature of a signed JWT. So I created a custom method that uses the Identity Model RequestTokenAsync model, but includes a signed JWT instead of a client secret.
First a version of IdentityModel.Client.ClientCredentialsTokenRequest that includes a signed JWT:
    /// <inheritdoc />
    /// <summary>
    /// Request for token using signed jwt as client_credentials.
    /// </summary>
    /// <seealso cref="T:IdentityModel.Client.ClientCredentialsTokenRequest" />
    public class JwtClientCredentialsTokenRequest : ClientCredentialsTokenRequest
    {
        /// <summary>
        /// Gets or sets the JWT.
        /// </summary>
        /// <value>
        /// The JWT.
        /// </value>
        public string Jwt { get; set; }
    }
Then an extension method based on RequestClientCredentialsTokenAsync that makes the request:
        /// <summary>
        /// Request a token based on client credentials with a signed JWT.
        /// </summary>
        /// <remarks>
        /// Based on https://www.imsglobal.org/spec/security/v1p0/#using-json-web-tokens-with-oauth-2-0-client-credentials-grant.
        /// </remarks>
        /// <param name="client">The client.</param>
        /// <param name="request">The request.</param>
        /// <param name="cancellationToken">The cancellation token.</param>
        /// <returns></returns>
        public static async Task<TokenResponse> RequestClientCredentialsTokenWithJwtAsync(this HttpMessageInvoker client,
            JwtClientCredentialsTokenRequest request, CancellationToken cancellationToken = default(CancellationToken))
        {
            request.GrantType = OidcConstants.GrantTypes.ClientCredentials;
            request.ClientAssertion = new ClientAssertion
            {
                Type = OidcConstants.ClientAssertionTypes.JwtBearer,
                Value = request.Jwt
            };
            if (!string.IsNullOrWhiteSpace(request.Scope))
            {
                request.Parameters.Add(OidcConstants.TokenRequest.Scope, request.Scope);
            }

            return await client.RequestTokenAsync(request, cancellationToken);
        }
And finally, wrap it up in a method the Tool can call to get an Access Token:
        /// <summary>
        /// Get an access token from the issuer.
        /// </summary>
        /// <param name="issuer">The issuer.</param>
        /// <param name="scope">The scope to request.</param>
        /// <returns>The token response.</returns>
        public async Task<TokenResponse> GetAccessTokenAsync(string issuer, string scope)
        {
            if (issuer.IsMissing())
            {
                return new TokenResponse(new ArgumentNullException(nameof(issuer)));
            }

            if (scope.IsMissing())
            {
                return new TokenResponse(new ArgumentNullException(nameof(scope)));
            }

            var platform = await _context.GetPlatformByIssuerAsync(issuer);
            if (platform == null)
            {
                return new TokenResponse(new Exception("Cannot find platform registration."));
            }

            // Use a signed JWT as client credentials.
            var payload = new JwtPayload();
            payload.AddClaim(new Claim(JwtRegisteredClaimNames.Iss, platform.ClientId));
            payload.AddClaim(new Claim(JwtRegisteredClaimNames.Sub, platform.ClientId));
            payload.AddClaim(new Claim(JwtRegisteredClaimNames.Aud, platform.AccessTokenUrl));
            payload.AddClaim(new Claim(JwtRegisteredClaimNames.Iat, EpochTime.GetIntDate(DateTime.UtcNow).ToString()));
            payload.AddClaim(new Claim(JwtRegisteredClaimNames.Nbf, EpochTime.GetIntDate(DateTime.UtcNow.AddSeconds(-5)).ToString()));
            payload.AddClaim(new Claim(JwtRegisteredClaimNames.Exp, EpochTime.GetIntDate(DateTime.UtcNow.AddMinutes(5)).ToString()));
            payload.AddClaim(new Claim(JwtRegisteredClaimNames.Jti, LtiRequest.GenerateCryptographicNonce()));

            var handler = new JwtSecurityTokenHandler();
            var credentials = PemHelper.SigningCredentialsFromPemString(platform.PrivateKey);
            var jwt = handler.WriteToken(new JwtSecurityToken(new JwtHeader(credentials), payload));

            var httpClient = _httpClientFactory.CreateClient();
            return await httpClient.RequestClientCredentialsTokenWithJwtAsync(
                    new JwtClientCredentialsTokenRequest
                    {
                        Address = platform.AccessTokenUrl,
                        ClientId = platform.ClientId,
                        Jwt = jwt,
                        Scope = scope
                    });
        }
I also used IdentityModel Protocol and Claim Type Constants.
Next time I’ll write about adding Swagger to the sample platform. That made development and ad-hoc test much easier.
