IMS and SLC living together

“Human sacrifice, dogs and cats living together… mass hysteria!”
– Dr. Peter Venkman

Can LTI and SLC live together peacefully or will there be mass hysteria?

The IMS Global Learning Consortium is

“Advancing Learning Impact by Enabling the Open Foundation for Seamless, Agile and Information-Rich Educational Technology Integration”

The Shared Learning Collaborative is

“…working to make personalized learning a reality for every U.S. student by improving the usefulness, variety and affordability of education technology”

They both talk about edtech. I was curious to see if they are trying to solve the same problem. I also like to get my hands dirty, so I recently made my Sample LTI Consumer Website (consumer website) a registered application in the SLC Sandbox. I found out that they (or at least LTI and IMS) are complementary solutions. They are trying to solve the same problem—integrating edtech—but at different layers of the stack. IMS is creating dialects that edtech systems can use to talk to each other (e.g. LTI), while the SLC is creating shared nouns and verbs so that all the systems can talk about the same thing (e.g. SLI).

The rest of this post describes the steps I went through to connect my consumer website to the SLC. All the code is in CodePlex. And you are welcome to connect your SLC Sandbox to my consumer website to see how it works, but please don’t use data about real people.

Future posts will describe how the SLC and the consumer website work together to share data including assignments and scores.

1. Sign Up for an SLC Sandbox Account

This is very straightforward. Go to http://dev.slcedu.org/getting-started and create a new sandbox account. You will need some sample data to play with. I used the small dataset. At this point you can login to the Sandbox Portal and play with the pre-registered applications. Once you are convinced there is some data to work with, it’s time to add your application to the portal.

2. Add Support for OAuth

Portal applications must support OAuth authentication. Luckily, my consumer website is based on the ASP.NET MVC 4 Internet Application template,

This template has built in support for OpenID and OAuth, including pre-configured support for Google, Facebook, Twitter, and LinkedIn,

These are all IAuthenticationClient’s in the DotNetOpenAuth library. To make use of the built in OAuth2 support, I created an IAuthenticationClient for the SLC Sandbox. I based it off of OAuth2Client which implements all the basic OAuth2 handshaking. It is too long to include in this post, but you can find the source code in CodePlex (SlcSandboxClient.cs). Basically I had to implement three overrides: GetServiceLoginUrl, QueryAccessToken, and GetUserData. Then I registered the new client in AuthConfig.RegisterAuth (AuthConfig.cs) and bobs-your-uncle, there it is:

It worked as a proof of concept, but quickly broke down when I thought about multiple sandboxes connecting to the consumer website.

The OAuth support built into the MVC template is designed with two assumptions:

  1. The OAuth exchange will start in the application. In other words, you visit the application (e.g. http://consumer.azurewebsites.net/Account/Login) and click on one of the identity providers (e.g. Facebook) to start the authentication process.
  2. The application (e.g. http://consumer.azurewebsites.net/) only has a single tenant so there is only one ClientID for each identity provider.

Both design assumptions are wrong with respect to the Sandbox Portal and my consumer website:

  1. When you use the SLC Sandbox Portal, you start the authentication process from within the identity provider (the SLC), not the application.
  2. The application (my consumer website) has multiple tenants (school districts) which want to completely isolate identity and data.

To solve these problem, I did two things:

  1. A tenant in the SLC must be registered in the consumer website (and the consumer website must be registered in the SLC).
  2. I require that the initial request from the Sandbox Portal includes the Client ID. If it is missing or unrecognized by the SlcSandboxClient, the authentication request is rejected.

When you launch my consumer website from your Sandbox Portal, the SlcSandboxClient will grab the Client ID from the request, lookup the tenant registration, and continue the authentication process.

That is why the SLC button in the screenshot above did not work. When you start the SLC authentication from the application, SlcSandboxClient does not know which Client ID to use. I suppose I could fix that too (for example, list all the registered tenants with a separate button), but for now, I simply hide the SLC button,

3. Register the Application

Now that the application (consumer website) supports OAuth, it was time to register the application in the Sandbox Portal. In the Url field, I entered the URL to the /Account/ExternalLogin2 action (ExternalLogin2 is identical to ExternalLogin, but it accepts a GET request) including the OAuth provider name (“slcsandbox”) and clientId. For example,

http://consumer.azurewebsites.net/Account/ExternalLogin2?provider=slcsandbox&clientid=waazoo

Note that I did not yet know the clientId, so just enter some bogus characters. In the Redirect Url field, I entered the URL to the /Account/ExternalLoginCallback action. For example,

http://consumer.azurewebsites.net/Account/ExternalLoginCallback

After activating the registration (by clicking on the In Progress button), I changed the Url to use the real Client ID that was assigned. For example,

http://consumer.azurewebsites.net/Account/ExternalLogin2?provider=slcsandbox&clientid=dyQSbXYliL

4. Register the Tenant

Now that I had the Client ID and Shared Secret, I registered my tenant (Sandbox Portal) with the consumer website. You must be logged in as a teacher to register a tenant.

5. Launch the Application

I logged out of the Sandbox Portal (to get out of the admin section) and selected Test Applications in My Sandbox. Then I impersonate one of the educators, and clicked on the application from step 3 above (Sample LTI Consumer in the screenshot below).

The first time you launch the consumer website, you will be prompted to associate your account with a local account,

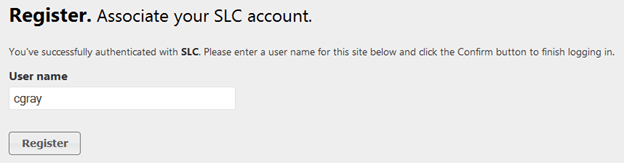
Once you are logged in, you can create courses or import your SLC sections (including student accounts), and create and launch assignments. More about that in the next post.

Posted in Uncategorized | Tagged , , , , | Leave a comment

Mobile UI

I’m experimenting with the jQuery Mobile and the mobile support in ASP.NET MVC. Using the Package Manager, I added jQuery.Mobile.MVC, and then created mobile specific views for Account > Login, Home > Index, and Course > Details.

ImageImage

You might notice that the mobile views do not have admin functionality (create a new course and create a new assignment). I thought they cluttered the display too much, so these are really better suited to students working on an assignment than a teacher setting up courses.

Posted in Uncategorized | Tagged , , | Leave a comment

Sample Provider Overview

If you’ve been watching source code repository for this blog, you’ll know there is probably a sample provider website to go along with the sample consumer website…and there is!

The sample provider website at http://provider.azurewebsites.net has the following features:

  • Register or log in using a local, Twitter, Facebook, Google, LinkedIn, or LTI Tool Consumer account (LTI 1.0 or higher).
  • Register LTI Tool Consumers with their key and secret.
  • Create as many Tools as you want.
  • Create Orders to bundle the Tools for Tool Consumers (you can limit access to the Tools based on the consumer’s state, school district, or school).
  • Launch Tools via LTI 1.0 or higher.
  • Send scores back to the Tool Consumer.

This is all wrapped up in an ASP.NET MVC 4.5 website using Entity Framework 5. There’s a lot of code, and you are probably interested in LTI stuff, so let me point out the interesting bits:

LtiAuthorizeAttribute.cs is an AuthorizeAttribute you can add to any MVC action. In this sample website, I’ve added it to the View action in ToolController.

[LtiAuthorize(Order = 0)]
[Authorize(Order = 1)]
public ActionResult View(int id, ViewMessageId? message)

Notice that I am using both the Authorize and LtiAuthorize attributes. The LtiAuthorize attribute will execute first, and if it succeeds, the Authorize attribute will exit immediately. This way, if you try to View a Tool directory (without using LTI), you still have to log in.

All of the LTI security methods are in LtiWebSecurity.cs which kind of mimics WebMatrix.WebData.WebSecurity.cs. Note that if an unrecognized Tool Consumer user tries to launch a Tool, the provider will prompt the user to create a local account. This is called pairing. Each local account can be paired to many Tool Consumers.

LtiOutcomes.cs handles all of the LTI Outcomes Service callbacks to the Tool Consumer with score information. If you connect to a Tool from multiple Tool Consumers, this sample provider can send scores back to all of them.

The sample consumer website has a couple of assignments predefined to use a tool on the sample provider website. You can use those to see what it looks like to log in to a Tool Consumer, launch a Tool in a Tool Provider and send a score back. Once you have seen the whole workflow, poke around in the code to see how it is done.

Posted in Uncategorized | Tagged , , | Leave a comment

Updated Sample Consumer

The sample consumer website at consumer.azurewebsites.net has had a lot of updates over the last month:

  • Restructured as a “traditional” LMS or portal style website. Assignments are organized into courses. Users are teachers, students, or both and can be enrolled (or not) in a course.
  • Support the LTI 1.1 Simple Outcomes Service. If the user is enrolled in the course, the service endpoint is sent to the provider so that it can record a grade back in the consumer.
  • Refactored the LTI code into two easy-to-find places: 1) OutcomesController.cs is an ApiController which supports all 3 outcome verbs (delete, read, and replace result). Note that the OAuth authentication for the OutcomesController is handled by the OAuthAuthorizeAttribute in the controller source file. And 2) LtiUtility.cs which has all the LTI utility methods such as CreateLtiRequest.
Posted in Uncategorized | Tagged , , | Leave a comment

Custom Substitution Parameters

In my last post I wrote about some custom context parameters that consumer.azurewebsites.net would send with every LTI request. After reading a discussion in the LTI forum, I decided to implement the additional context data available via custom substitution parameters. Specifically,

Substitution Description Example
$Context.stateId The state abbreviation AL
$Context.leaSourcedId The NCES ID for the LEA (e.g. school district) nces.ed.gov:4101920
$Context.schoolSourcedId The NCES ID for the school nces.ed.gov:410192000554

As a Tool Provider, you can request these custom parameters. For example,

The custom parameters that provider.azurewebsites.net requests.

The custom parameters that provider.azurewebsites.net requests.

Posted in Uncategorized | Leave a comment

Extended context data

The LTI 1.1.1 specification includes 2 sets of elements that are used by a tool provider to figure out the context of a launch:

  • tool_consumer_instance (_guid, _name, _description, _url and _contact_email…that last if you are really desparate)
  • context (_id, _type, _title, and _label)

We can think of the context_id as as the class id. But the specification describes tool_consumer_instance_guid like this:

This is a unique identifier for the TC [tool consumer].  A common practice is to use the DNS [i.e. a domain name rather than a traditional GUID] of the organization or the DNS of the TC instance.  If the organization has multiple TC instances, then the best practice is to prefix the domain name with a locally unique identifier for the TC instance.  In the single-tenancy case, the tool consumer data can be often be derived from the oauth_consumer_key.  In a multi-tenancy case this can be used to differentiate between the multiple tenants within a single installation of a Tool Consumer. This parameter is strongly recommended in systems capable of multi-tenancy.

Unfortunately, the ambiguity of what the tool_consumer_instance represents causes a real problem for providers in K-12 education. The tools and content that they provide are often differentiated for the specific state, district, and school where they are being consumed. For example, they might show different state standard correlations to teachers in Alabama than they would to teachers in Oregon. And providers that control access to their tools or content need to figure out if the launch is authorized. In K-12 education, the customer can be the state DOE, a district (or group of districts), a school, or even the classroom teacher.

To solve both of those problems for the provider, K-12 tool consumers should send enough information for the provider to figure out if they can grant access to the learning object and which version to present. The Consumer web site does this by sending the state, LEA (general form of a U.S. school district) and school with each launch. To ensure that providers know which state, LEA and school the Consumer web site is talking about, it uses data from the Elementary/Secondary Information System (ElSi) of the National Center for Education Statistics (NCES).

The LTI specification says that if a tool consumer “wants to extend [the Basic Launch Data], they should prefix all fields not described herein with ‘ext_'”. Therefore, the Consumer web site introduces 6 optional context parameters:

  • ext_context_state_id
    The state abbreviation which is a key value in the data that ElSi provides. For example, “OR”.
  • ext_context_state_name
    The name of the state. For example, “Oregon”.
  • ext_context_lea_sourcedid
    The NCES id and/or the State DOE id for the LEA. If both are included, they are separated by a comma. For example, “nces.ed.gov:4101920,ext_context_state:00000000002243”.
  • ext_context_lea_name
    The name of the LEA. For example, “BEAVERTON SD 48J”.
  • ext_context_school_sourcedid
    The NCES id and/or the LEA id for the school. If both are included, they are separated by a comma. For example, “nces.ed.gov:410192000554,ext_context_lea:00000000000000001320”.
  • ext_context_school_name
    The name of the school. For example, “WESTVIEW HIGH SCHOOL”.

Given this additional context information, providers can authorize access to their tools and content; and appropriately differentiate the student and teacher experience.

As always the source code is checked in to CodePlex. In particular, see the AddExtendedParameters in AssignmentController and Readme.txt in the App_Data folder.

Posted in Uncategorized | Tagged , , , , , | Leave a comment

Using HtmlAgilityPack to convert the resource_link_description to plain text

From the LTI 1.1.1 specification,

resource_link_description=…
A plain text[1] description of the link’s destination, suitable for display alongside the link. Typically no more than a few lines long. This parameter is optional.

[1] Plain text means that the Tool Provider will treat the parameter value as text/plain and not text/html. If the TC includes characters such as less-than or greater-than in plain text fields, those characters are to be escaped and displayed. In particular, the TC should not embed HTML tags in plain text fields with the expectation that the HTML will be handed directly to the browser. For example, if a plaintext field contains the string “Building <strong> Interoperability”, the TP should escape the data so the user sees the less-than, greater-than, and text between them literally rather than switching the word “Interoperability” to be in bold font.

The Consumer site supports HTML assignment descriptions. So we need to convert the HTML to plain text for the resource_link_description. Poking around StackOverflow, I kept reading about HtmlAgilityPack. It turns out to be pretty easy to use.

First, I installed HtmlAgilityPack using NuGet. Then I wrote an extension method called ToPlainText for the HtmlDocument type based on the HtmlAgilityPack Html2Text sample. And finally, I modified BuildBaseLtiRequestData to add the resource_link_description.

// The description is entirely optional, but if you do include it, it
// must be converted to plain text.
if (!string.IsNullOrWhiteSpace(assignment.Description))
{
    var doc = new HtmlDocument();
    doc.LoadHtml(assignment.Description);

    parameters.AdditionalParameters.Add("resource_link_description",
        doc.ToPlainText());
}

The source code is checked in to CodePlex.

Posted in Uncategorized | Tagged , , | Leave a comment

Online Tool Consumer now supports Twitter, Facebook, Google, and Microsoft Live login

My sample tool consumer web site is based on the ASP.NET MVC 4 Web Application Template. I chose to start with a template so I could get right to the stuff that I find interesting and not worry too much about the navigation plumbing. The template includes several cool features such as a layout that adapts well to mobile devices and compatibility with Azure web sites.

Last night I took advantage of another feature of the template: built in support for OpenID and OAuth. That means you can now log in using your Twitter, Facebook or Google account. If you already have an account on the Consumer site, go to your Account page and simply add your Twitter, Facebook or Google account. It will be connected to your existing account and then you can log in directly or with your external account. If you don’t have an account on the Consumer site, you can create one without registering first by logging in with the external account. You will be registered in the process.

Adding the support was easy: 1. Sign up for developer accounts (typically that just meant adding developer role to my existing account), 2. Register the Consumer web site on Azure, 3. Copy and paste the keys and secrets into App_Start\AuthConfig.cs (you won’t find them in the source code…I don’t want to share my secrets). That took about 20 minutes, then 2 more to build and publish the site to Azure.

Once that was working, I made a few changes to AccountController to better integrate the experience. First, I changed ExternalLoginConfirmation so that if a new account is created in Consumer (i.e. the user is logging in for the first time using an external system and creating an account on the fly) the new user gets the Teacher role (so they can create assignments) and they are redirected to their Profile page so they can select their schools and choose their privacy settings.

OAuthWebSecurity.CreateOrUpdateAccount(provider, providerUserId, model.UserName);
if (OAuthWebSecurity.Login(provider, providerUserId, createPersistentCookie: false))
{
    // Add the user to Teacher role by default
    Roles.AddUserToRole(model.UserName, UserRoles.TeacherRole);
}
return RedirectToAction("Edit", "User", routeValues: new { id = WebSecurity.GetUserId(model.UserName) });

The second change was to get the user’s name and email address from the external system. To do that I look in the AuthenticationResult captured by ExternalLoginCallback. OAuthWebSecurity puts all the data that is sent with the callback into a dictionary called ExtraData. I look in that dictionary for name and email keys. If I find any, I add them to the RegisterExternalLoginModel so ExternalLoginConfirmation can use them to create a new account.

First collect the name and email address in ExternalLoginCallback

if (result.ExtraData.ContainsKey("email"))
    email = result.ExtraData["email"];
if (result.ExtraData.ContainsKey("firstname"))
    firstname = result.ExtraData["firstname"];
if (result.ExtraData.ContainsKey("lastname"))
    lastname = result.ExtraData["lastname"];
if (result.ExtraData.ContainsKey("name"))
{
    var name = result.ExtraData["name"];
    var names = name.Split(' ');
    if (names.Length == 1)
        lastname = name;
    if (names.Length > 1)
    {
        firstname = names[0];
        lastname = string.Join(" ", names.Skip(1).ToList());
    }
}

return View("ExternalLoginConfirmation", 
    new RegisterExternalLoginModel 
    { 
        UserName = result.UserName, 
        ExternalLoginData = loginData,
        Email = email,
        Firstname = firstname,
        Lastname = lastname
    });

Then use them in ExternalLoginConfirmation if a new account is created

// Insert name into the profile table
user = new User 
{ 
    UserName = model.UserName,
    Email = model.Email,
    FirstName = model.Firstname,
    LastName = model.Lastname
};
db.Users.Add(user);

All the changes are checked into CodePlex. I’m really happy I started with a template. The entire process of signing up for accounts, enabling OpenID/OAuth, and customizing the integration took about an hour. I don’t see how that would be possible without starting from a solid base.

Posted in Uncategorized | Tagged , , , , | Leave a comment

Sample LTI Consumer now on Azure

The sample Consumer app I’ve been posting about is now running in the cloud on Azure, http://consumer.azurewebsites.net/.

The data will get wiped out from time to time, but not too often I think. Anyone can register themselves. You must give yourself the teacher role (see your profile) to create or edit assignments, but both students and teachers can launch assignments. If you select a state, district or school, you can limit the scope of your assignments to other users in the same state, district or school. You can also make them private (the default) and public (all users can see them).

Let me know if you have any questions here in the comments or at http://ltisamples.codeplex.com.

Posted in Uncategorized | Tagged , , | Leave a comment

I can’t decide…

CodePlex

  • Seems to have more .NET projects than GitHub
  • Integrates seamlessly with Visual Studio 2012 source control
  • Presents a “front door” to the project

GitHub

  • Seems to be talked about more than CodePlex
  • The vibe seems to better aligned with code samples
  • Gists (although I would prefer something that worked directly with the code repository)

…so I am using both for now.

Posted on by Andy | 2 Comments